


I build on Windows. Apple’s toolchain runs only on macOS. That tension is the whole story of this post, and it has a better answer than “buy a Mac and move your life onto it” — though it does, unavoidably, involve a Mac somewhere.

This is a working log of shipping SplitEasy to the App Store: what I clicked, what broke, and the three failures that don’t appear in any tutorial because they only surface when you actually upload a build. If you’re publishing a .NET MAUI app from Windows, you will hit at least one of them.
What SplitEasy is
SplitEasy splits shared trip expenses. You log what everyone paid along the way, and it works out the fewest payments that settle the trip — down to the last penny.
The thing that makes it more than a shared spreadsheet is that bills don’t divide evenly in real life, so it offers five ways to split:
| Method | What it’s for |
|---|---|
| Equally | Everyone included owes the same share. Odd pennies get handed out, never dropped. |
| Exact amounts | You set each figure, for bills where everyone knows what they ordered. |
| Percentages | The couple takes 60% of the apartment, the single room takes 40%. |
| Shares | Two nights is two shares. A family of three is three shares. |
| Evenly, with adjustments | Split evenly, then add £6 for whoever had the starter. Adjustments need not cancel out. |
Alongside that: it works offline (expenses save to the device first — nothing waits on a connection, which matters on a boat or a mountain), you can pay in one currency and settle in another at a rate you set, and it records payments that have actually been made so balances genuinely clear rather than just being suggested.
There’s no account to create. Install it and start a trip. Expenses stay on your device.
For the developers reading
A few architectural decisions that are relevant to why publishing went the way it did:
- .NET 10, targeting Android, iOS, Mac Catalyst and Windows from one MAUI project, plus a Blazor web app.
- The view models are shared and UI-framework-free.
SplitEasy.ViewModelshas no dependency on MAUI or Blazor; a XAML page and a Razor component bind to the same objects. The difference between a phone and a server is auserIdparameter, not a second implementation. When I added solo trips, one change covered both clients. - Rounding is a stated convention: round each split to 2dp, then add the remainder to the last split, so splits always sum exactly to the total. A penny is never invented or lost.
- Settlements use greedy debtor/creditor matching to minimise the number of transactions, netting recorded payments off first.
That shared-view-model design is also why the store screenshots could be generated from real data run through the real calculation engine, rather than mocked up — but that’s a different post.
Part 1 — The Windows problem, honestly stated
You need a Mac. There is no way around it. Release builds, code signing, .ipa creation and upload to App Store Connect all require macOS and Xcode.
What you don’t need is to work on the Mac. Visual Studio on Windows can drive a Mac over the network — you write code, press F5, and the Mac does the Apple-specific work. The Mac can be a spare Mac mini on your desk, a cloud Mac rented by the hour (MacStadium, Scaleway, AWS EC2 Mac), or a macOS CI runner.
| Route | Cost | When it fits |
|---|---|---|
| Your own Mac | one-off; any Apple Silicon Mac | you publish repeatedly and want to actually run the Mac Catalyst build |
| Cloud Mac | hourly or monthly | you need a Mac only at release time |
CI runner (GitHub Actions macos-latest) |
per-minute; free allowance on public repos | you want releases automated |
A Mac is also the only way to capture App Store screenshots, since the iOS simulators exist nowhere else.
Part 2 — Pairing Visual Studio to a Mac
This is the part that turns Windows development from impossible into merely indirect.
On the Mac, first
- Install Xcode from the Mac App Store, open it once, and accept the licence. Visual Studio talks to the Mac through Xcode’s tooling, so an Xcode that has never been launched will fail in confusing ways.
- Enable Remote Login. System Settings → General → Sharing → Remote Login → on, and make sure your user account is in the allowed list. This is SSH; it’s how Visual Studio connects.
- Note the Mac’s name or IP address. System Settings → General → Sharing shows the local hostname, something like
Enricos-Mac-mini.local. - Keep both machines on the same network.
On Windows
- Install Visual Studio 2022 with the .NET Multi-platform App UI development workload.
- Open the solution and set the target framework to
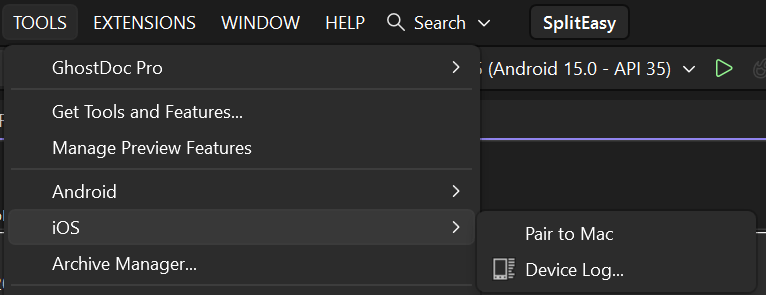
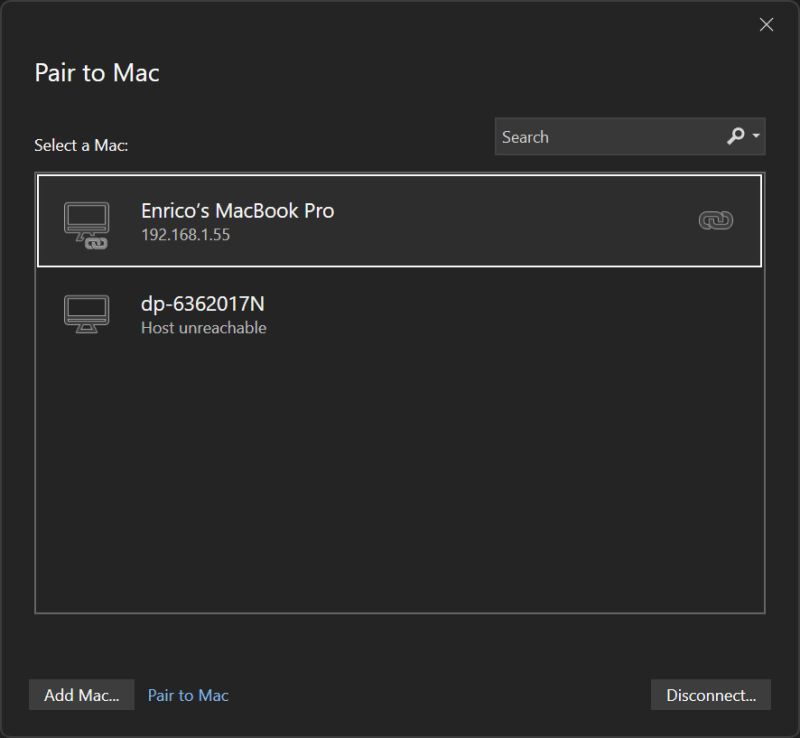
net10.0-ios. - Tools → iOS → Pair to Mac (there’s also a Pair to Mac button on the iOS toolbar).
- Pick your Mac from the list, or click Add Mac and type the hostname or IP.
- Enter your macOS username and password — the account, not your Apple ID. These are two different credentials and mixing them up is the most common first failure.
- Visual Studio checks what’s installed on the Mac and offers to install anything missing (the .NET SDK, the iOS workloads). Let it. This takes a while the first time.
A green connection indicator means you’re paired. The iOS simulator list in the debug target dropdown will populate with simulators running on the Mac, and — a genuinely nice touch — the simulator window can be mirrored onto your Windows desktop so you can interact with it without touching the Mac.
When pairing fails
- “Could not connect” — Remote Login is off, or a firewall is blocking SSH on port 22.
- Version mismatch warnings — the Xcode version on the Mac doesn’t match what your .NET iOS workload expects. Update Xcode, or install the matching workload version.
- Pairing works but builds fail with signing errors — that’s Part 4, not pairing.
- It paired yesterday and not today — the Mac’s IP changed. Use the
.localhostname rather than a raw IP.
Adding your Apple ID to Visual Studio
Tools → Options → Xamarin → Apple Accounts (the node is still called Xamarin in VS 2022, which is confusing but correct). Add your Apple ID here and Visual Studio can view your signing identities and provisioning profiles, and create them for you.
Then in the project’s iOS Bundle Signing properties, leave Automatic Provisioning on. I’ll come back to why this matters.
Part 3 — Hot Restart, and the trap that cost me an evening
Visual Studio has a feature called Hot Restart that deploys a Debug build to an iPhone plugged into your Windows machine, with no Mac involved at all. For day-to-day work it’s excellent: change code, press F5, see it on a real device.
Then I hit a crash on launch:
This app has crashed because it attempted to access privacy-sensitive data
without a usage description. The app's Info.plist must contain an
NSUserTrackingUsageDescription key with a string value explaining to the user
how the app uses this data.
Straightforward enough. I added the key to Platforms/iOS/Info.plist, redeployed, and got exactly the same crash.
Here’s the trap, and it’s worth tattooing somewhere:
Hot Restart deploys a prebuilt stub app bundle. It does not apply your
Info.plist.
Managed code changes take effect. Manifest changes, entitlements and storyboards do not. So any bug whose fix lives in Info.plist will appear unfixable under Hot Restart, and you can burn a lot of time re-checking a file that was correct the whole time.
If a plist change doesn’t seem to take, stop debugging the plist and check how you’re deploying. Build through the paired Mac instead.
Part 4 — developer.apple.com
Two portals, and conflating them is the usual time sink:
- developer.apple.com owns identity — who you are and what may be signed.
- appstoreconnect.apple.com owns the app — its record, metadata, builds and review.
Nothing about your listing lives on developer.apple.com.
Step 1 · Enrol in the Apple Developer Program
£79/$99 a year. Individual enrolment is fast and your legal name becomes the seller name; organisation enrolment needs a D-U-N-S number and can take weeks. Start this before anything else — everything below is greyed out until it completes and is billed.

Step 2 · Register the App ID
Certificates, Identifiers & Profiles → Identifiers → + → App IDs → App
- Description:
SplitEasy - Bundle ID: Explicit,
app.spliteasy.app. Wildcards can’t be used for App Store distribution. - Capabilities: for SplitEasy, none. No push, no iCloud, no associated domains, no Sign in with Apple, no StoreKit.
That last point deserves emphasis. It’s tempting to tick capabilities speculatively. Don’t — enabling capabilities the app doesn’t use is a common cause of provisioning failures later, and they’re a nuisance to unpick. A good sanity check: if your project has no Entitlements.plist under Platforms/iOS/, you almost certainly need no capabilities.
Your bundle ID is permanent. It cannot be changed once a version has shipped under it, on either store.
A MAUI-specific landmine here. The project template sets
<ApplicationId>tocom.companyname.yourapp. I’d overridden it to the real value in eight per-configuration property groups — which covered the eight Configuration/TargetFramework/Platform combinations I’d thought of, and left every other one falling back to a name that must never reach a store. Set it once, in the mainPropertyGroup, and delete the overrides. Thengrepyour csproj forcom.companynameas a standing check.
Visually, you can see.

After selecting App IDs, the next step is confirm what kind of identifier you want to create. In my case, I select App.

Then, there is the list of capabilities for the application.

Step 3 · Certificates and profiles — or, how to skip them
The manual path is Certificates → + → Apple Distribution (one certificate now covers both iOS and macOS App Store distribution), which requires a certificate signing request generated on the Mac via Keychain Access → Certificate Assistant → Request a Certificate From a Certificate Authority. Then Profiles → + → App Store, binding the App ID to the certificate.
Don’t do that. With your Apple ID added to Visual Studio and Automatic Provisioning enabled in the iOS Bundle Signing properties, Visual Studio creates the certificate and the provisioning profile for you, correctly, in seconds.
Hand-managed signing is the single largest source of lost afternoons in Apple distribution. Nothing about a typical MAUI app requires it.
(If you’re shipping Mac Catalyst too, you need a second certificate — Mac Installer Distribution — which signs the .pkg rather than the app.)
Part 5 — App Store Connect
Accept the agreements
Business → the Free Applications agreement must show Active, not Pending, before a free app can be distributed. SplitEasy is free with ads, and ad revenue comes from Google rather than Apple, so no banking details are needed. That changes the day you sell a subscription.
Create the app record
Apps → New App
- Platform: iOS (macOS can be added to the same record later)
- Bundle ID: pick
app.spliteasy.app— it only appears here once registered as an App ID - SKU: any private string, never shown to anyone
- Primary language: whatever your listing’s primary locale is

And now, fill the form

Issue with Xcode version
Very often I had this compatibility issue between Xcode and NET. The compiler is not updated as fast as Apple updates Xcode. For this reason, it is necessary to use the version that NET needs. I highlighted this issue in my previous post.
/usr/local/share/dotnet/packs/Microsoft.iOS.Sdk.net10.0_26.5/26.5.10284/targets/Xamarin.Shared.Sdk.targets(2570,3): error This version of .NET for iOS (26.5.10284) requires Xcode 26.5. The current version of Xcode is 26.6. Either install Xcode 26.5, or use a different version of .NET for iOS. See https://aka.ms/xcode-requirement for more information.
Read that carefully, because the obvious interpretation is wrong. My Xcode was newer than the one demanded, and it still failed.
The Xcode requirement is an equality, not a minimum. Each release of .NET for iOS is built against exactly one Xcode version and refuses anything else, newer included.
That is deliberate — the SDK binds to Apple’s toolchain closely enough that “probably compatible” is not good enough — but it does mean that letting Xcode auto-update will break your iOS build on a day you had other plans.
There are two ways out. Try them in this order.
Option 1 — Update the workload (two minutes, no large download)
Support for a new Xcode usually lands in a .NET for iOS release within a few weeks. So before downloading 15 GB, check whether the fix already exists:
dotnet workload update
dotnet workload list
If a Microsoft.iOS workload supporting your installed Xcode is available, this resolves it and leaves you on current tooling, which is the better outcome. If your project has a global.json pinning the SDK, that constrains what update can move to — worth checking.
If no such workload exists yet, you need the older Xcode.
Option 2 — Install the exact Xcode, alongside the one you have
You do not have to uninstall anything. macOS runs multiple Xcode versions side by side and you choose which one the build uses.
Step 1 — Download it. Go to developer.apple.com/download/all and sign in. This is the only source for older versions; the Mac App Store always gives you the latest and offers no choice. Search for the version the error named and take the .xip.
Budget for it: the download is roughly 10–15 GB, and expansion needs about as much again, so have ~50 GB free.
Step 2 — Expand it and give it a versioned name.
xip --expand Xcode_26.5.xip          # or double-click the .xip in Finder
mv Xcode.app /Applications/Xcode_26.5.app
Rename it before moving it into /Applications, or it will overwrite the Xcode already there. The convention worth adopting: keep your current Xcode as plain Xcode.app and give every pinned version an explicit name.
Step 3 — Point the toolchain at it.
sudo xcode-select -s /Applications/Xcode_26.5.app
xcode-select -p        # confirm the path
xcodebuild -version    # should now report the version you installed
Step 4 — Run the first-launch steps. A freshly expanded Xcode has not accepted its licence or installed its components, and the build fails on both:
sudo xcodebuild -license accept
sudo xcodebuild -runFirstLaunch
Then build again.
Switch per build, not globally
xcode-select changes the Xcode for everything on that Mac, which is a blunt instrument if other projects live there. You can scope it to a single command instead:
DEVELOPER_DIR=/Applications/Xcode_26.5.app/Contents/Developer \
  dotnet publish SplitEasy.Maui -f net10.0-ios -c Release \
  -p:ArchiveOnBuild=true -p:RuntimeIdentifier=ios-arm64
Same result, nothing else on the machine disturbed.
One caveat if you are driving from Windows. A build launched through Pair to Mac uses whichever Xcode the Mac has selected, so xcode-select is what governs it — setting DEVELOPER_DIR on the Windows side has no effect. If you work mostly through Visual Studio, set the selection globally and accept the bluntness.
Stop it happening again
Two guards, both cheap:
- Turn off automatic Xcode updates, or at least stop treating them as routine. An Xcode upgrade is a toolchain migration for a .NET MAUI project, not a patch.
- Pin the .NET SDK with a
global.jsonat the repository root, so the workload cannot drift under you between machines or between months. .NET 9 and later can also pin workload sets; check the current schema for the exact key rather than copying one from a blog post — including this one.
And write the required Xcode version down somewhere the next person will look. On this project it lives in the submission guide next to the build commands, because the moment you need it is the moment you are least inclined to go hunting for it.
Part 6 — The three failures nobody warns you about
This is the part I actually wanted to write down.
1. App Tracking Transparency terminates your app
If anything in your process touches ATT and Info.plist has no NSUserTrackingUsageDescription, iOS does not refuse the request — it kills the process. It presents as a crash, not a permission denial, which sends you looking in the wrong place.
The trigger in my case wasn’t my code at all. The MauiAdMob plugin’s initialiser has this signature:
Init(license, nativeAdsId, openAdsId, enableOpenAds, tagForUnderAgeOfConsent,
     testDeviceIds, geography, initialiseConsentAtStartup = true,
     debugMode = false, handleTrackingAuthorization = true)
handleTrackingAuthorization defaults to true. So a bare Init(license) in FinishedLaunching asks iOS for tracking permission on the first frame.
Two fixes, and I applied both:
CrossMauiMTAdmob.Current.Init(
    Constants.AdMob.License,
    handleTrackingAuthorization: false);
The key belongs in Info.plist regardless — you need it the moment anything requests ATT. But the flag is the load-bearing fix, because a plist edit doesn’t necessarily reach a running build (see Part 3).
There’s a second, quieter reason to turn it off: Apple only shows the ATT prompt while the app is active, and FinishedLaunching is before that. Even with the key present, the prompt could silently never appear and the status sit at NotDetermined forever. If you want personalised ads, request ATT deliberately from a screen the user is already looking at — not on the first frame.
Write the usage string for the person reading the prompt, not the reviewer. Apple rejects vague ones:
SplitEasy is free because it shows ads. Allowing this lets those ads be matched to you using your activity in other apps. Refuse and you will still see ads, just less relevant ones.
2. ITMS-91053: the privacy manifest
Since 2024, Apple requires apps to declare “required reason APIs” in a PrivacyInfo.xcprivacy file. The MAUI template gives you one, pre-filled for the .NET runtime’s own usage — file timestamps, boot time, disk space.
It also contains this, commented out:
<!--
    The entry below is only needed when you're using the Preferences API in your app.
<dict>
    <key>NSPrivacyAccessedAPIType</key>
    <string>NSPrivacyAccessedAPICategoryUserDefaults</string>
    ...
</dict> -->
SplitEasy uses Preferences to store its sync watermark. MAUI’s Preferences is NSUserDefaults on Apple platforms. So that entry needed uncommenting, or the upload gets rejected with ITMS-91053: Missing API declaration.
The subtlety worth knowing: Apple’s check reads your binary, not your call graph. My sync feature is gated behind a subscription check that currently always returns false, so that code never runs — but the call is still linked in, and the check finds it. “It’s disabled” is not a defence.
Audit that file against what your app actually does. The template’s defaults are a starting point, not an answer.
3. Every NS*UsageDescription is a crash waiting to happen
Same failure mode as ATT, different key. My cover-photo picker uses MediaPicker, so iOS needs NSPhotoLibraryUsageDescription. That was present.
Mac Catalyst had no such key — because Platforms/MacCatalyst/Info.plist is a completely separate file that inherits nothing from the iOS one. Any macOS user picking a trip cover would have had the app die on them.
If you target Mac Catalyst, diff the two plists. They drift silently and nothing in the build warns you.
Bonus: the same lesson on the other store
While this was going on, Google Play flagged SplitEasy for requesting READ_MEDIA_IMAGES. Their photo and video permissions policy only allows it on API 33+ when the system pickers can’t do the job — and mine could. MAUI’s MediaPicker.PickPhotosAsync goes through PickVisualMedia, the Android photo picker, which returns exactly the images the user selected and needs no permission at all.
The permission had been declared defensively and was never required. Removing one line fixed it.
The general lesson holds on both stores: audit what your manifests claim, against what your code actually does.
Part 7 — Screenshots
Apple’s sizes are not Google’s, so you can’t reuse Play assets. At minimum you need iPhone 6.9" (1320 × 2868 or 1290 × 2796), plus iPad 13" if you ship iPad, plus separate macOS sizes for Mac Catalyst. Apple revises these, so check the version page before capturing a full set.
Capture from a simulator on the Mac:
xcrun simctl io booted screenshot out.png
One tip that saved me: seed your demo data programmatically, through your real persistence layer and real calculation engine. Every figure in my screenshots was computed by the same code the app runs, so what a reviewer sees is what the app would actually display. Numbers typed into a mockup drift from your rounding rules the moment either changes.
And fix the identifiers in your seed data. My avatar colours are derived from a participant’s GUID, so regenerating the seed repainted every avatar and made one set of screenshots disagree with the next about what colour a person was.
Part 8 — Building and submitting
There are two routes, and I’d recommend the second for your first submission.
From Visual Studio with a paired Mac: set the configuration to Release and the target to a physical device or generic device (alias Remote Device), then use the publish flow. Visual Studio drives the archive on the Mac.
From the Mac, with the CLI — fewer moving parts when something goes wrong:
dotnet publish SplitEasy.Maui -f net10.0-ios -c Release \
  -p:RuntimeIdentifier=ios-arm64
Then upload the .ipa with Transporter (free from the Mac App Store — drag in, press Deliver).
The one that caught me.
dotnet publishon its own produces the.ipa, inbin/Release/net10.0-ios/ios-arm64/publish/. Adding-p:ArchiveOnBuild=trueproduces an.xcarchiveinstead, tucked away in~/Library/Developer/Xcode/Archives/, and you upload that from Xcode → Window → Organizer → Distribute App rather than from Transporter.They are two different workflows and mixing them gives you a successful build and no
.ipaanywhere, which is a confusing thing to debug at the end of a long day. Either is fine — Organizer is arguably the smoother of the two once you are on the Mac — but pick one.
Three things have to be true for an .ipa to appear at all: a device runtime identifier
(ios-arm64, not a simulator), Release configuration, and signing that actually resolves.
If the build succeeds and leaves a .app but no .ipa, signing is what failed — name the identity
explicitly:
dotnet publish SplitEasy.Maui -f net10.0-ios -c Release \
  -p:RuntimeIdentifier=ios-arm64 \
  -p:CodesignKey="Apple Distribution: Your Name (TEAMID)" \
  -p:CodesignProvision="Your App Store profile name"
Can’t find the .ipa?
This is common enough to be worth a checklist. Work through it in order — it is almost always the first one.
1. Check whether you archived instead of publishing. The archive does not go anywhere near your project directory:
ls -lt ~/Library/Developer/Xcode/Archives/*/ | head
A recent .xcarchive there means your build worked and there was never going to be an .ipa. Don’t re-run anything — open Xcode → Window → Organizer, select it, and press Distribute App.
2. Look where the .ipa actually lands. Not in bin/Release/net10.0-ios/ but a level deeper, under the runtime identifier:
find . -name "*.ipa" -mmin -60
3. If the build succeeded and left a .app but no .ipa, signing failed. This is the one that wastes time, because a signing failure does not always surface as a build error — the publish reports success and quietly skips packaging. Scan the output for codesign or provisioning before assuming the build was clean.
Get the exact identity string:
security find-identity -v -p codesigning
Pass the whole thing, team ID in brackets included, to -p:CodesignKey. The profile name for -p:CodesignProvision is whatever it is called on developer.apple.com — or the one Xcode’s automatic signing generated for you, which is usually something like iOS Team Store Provisioning Profile: app.spliteasy.app.
4. Confirm the runtime identifier is a device one. ios-arm64. A simulator RID builds happily and produces nothing you can upload.
Version numbers
Two properties, easy to confuse:
ApplicationDisplayVersion→CFBundleShortVersionString— the version people see (1.0)ApplicationVersion→CFBundleVersion— the build number
The build number must increase on every upload, and a value can never be reused — even by a build that was rejected. Your Android versionCode is independent; they don’t have to agree.
Before you submit
Install the build on your own device through TestFlight and open every screen. It’s the last chance to see the app as a user before a reviewer does.
Then attach the build to the version, complete App Privacy (for an app like mine, what you’re really declaring is the ad SDK’s collection, not your own — use Google’s published disclosure guidance rather than guessing), answer export compliance, and submit.
Review is usually a day or two. Expect at least one round of questions on a first submission; replies go through App Review → Messages, not email.
Part 9 — Should you ship macOS?
Mac Catalyst makes a macOS build almost free, which is exactly why it deserves a deliberate decision rather than a reflexive tick.
For SplitEasy I decided to ship iOS first, for two honest reasons:
- The Mac build has no ads. My ad banner is behind
#if ANDROID || IOS, so the macOS version is the only unmonetised one. - The Mac build had never been run. Its missing photo-library key was found by reading the file, not by launching the app. A phone-shaped Shell with a bottom tab bar, in a resizable Mac window, is a layout nobody had looked at — and I’d rather look at it myself than have a reviewer do it for me.
macOS can be added to the same App Store Connect record whenever you’re ready. If you do ship it: your Catalyst Entitlements.plist needs App Sandbox and outgoing network entitlements, you need a separate privacy manifest (the iOS one doesn’t travel), and the Mac App Store rejects arm64-only builds — ship both architectures:
dotnet publish SplitEasy.Maui -f net10.0-maccatalyst -c Release \
  -p:CreatePackage=true -p:RuntimeIdentifiers="maccatalyst-x64;maccatalyst-arm64"
The short version
If you take five things from this:
- You need a Mac, but you don’t need to work on it. Pair to Mac makes Windows development genuinely viable.
- Hot Restart ignores your
Info.plist. If a manifest fix doesn’t take, check how you’re deploying before you doubt the fix. - Read your dependencies’ defaults. A third-party SDK asking for tracking permission on your behalf, on the first frame, is the kind of thing that only shows up as a crash.
- Audit your manifests against your actual code — on both stores. Almost every submission failure I hit was a claim in a manifest that didn’t match what the app did.
- Pin your toolchain. .NET for iOS demands one exact Xcode version, and an Xcode auto-update will break your build on a day you had other plans.
Adding the macOS version
I went back and did this once iOS was submitted. Reason number two from Part 9 turned out to be the easy one: the Mac build ran first time. The phone-shaped Shell in a resizable window looks better than I’d feared — the bottom tab bar becomes a floating pill, the trip list gets room to breathe, and nothing was clipped or misaligned. If you have been putting off looking at your Catalyst build, it may cost you less than you think.
The rest of it cost more.
First: is there anything to build?
Before writing any of this, check whether you need a Mac build at all. If your app supports iPad, Apple can offer the same iOS binary on Apple Silicon Macs — it’s an availability setting on the existing app record, not a second platform. No target, no build, no second review.
The reason I didn’t take it is specific to how SplitEasy is monetised, and it’s worth stating because it cuts the opposite way to what you’d guess:
| iPad app on Mac | Mac Catalyst | |
|---|---|---|
| Build to make | none | a .pkg |
| Runs on | Apple Silicon only | Apple Silicon and Intel |
| Ad banner | yes — it’s the iOS binary | no — mine is behind #if ANDROID || IOS |
The Catalyst build is the one that earns nothing. The free tier is ad-supported, there’s no ad on Catalyst, and there’s nothing else to sell yet. The zero-effort route is also the one that keeps the business model intact. Decide that before you spend an afternoon on the other.
Trap 1: the privacy manifest doesn’t travel
Part 6 covered PrivacyInfo.xcprivacy and ITMS-91053 for iOS. Here’s what I hadn’t realised: the file under Platforms/iOS/Resources/ belongs to the iOS target. A Catalyst build made without its own copy ships no privacy manifest at all — not an incomplete one, none — and collects the same ITMS-91053 on upload.
It’s the same lesson as the missing photo-library key in Part 6.3, one level up: it isn’t just the two Info.plist files that inherit nothing from each other, it’s everything under Platforms/.
The fix is a copy at Platforms/MacCatalyst/Resources/PrivacyInfo.xcprivacy. What matters is checking it landed:
APP=SplitEasy.Maui/bin/Debug/net10.0-maccatalyst/maccatalyst-arm64/SplitEasy.app
find "$APP" -name PrivacyInfo.xcprivacy
# <app>/Contents/Resources/PrivacyInfo.xcprivacy
Nothing keeps the two files in step. Add a declaration to one and you must add it to the other by hand.
Trap 2: an incremental build doesn’t re-merge Info.plist
This one wasted a genuinely stupid amount of time, and it’s a cousin of the Hot Restart trap in Part 3.
I added ITSAppUsesNonExemptEncryption to the Catalyst Info.plist — the export-compliance key, worth setting so App Store Connect stops asking on every upload. Rebuilt. Checked the built bundle. Key absent. Edited again, rebuilt, absent. Linted the source: valid, key present.
dotnet build does not re-run the plist merge on an incremental build. The source file was right the whole time; the bundle kept the old one, and every check I ran reported the value I’d just added as missing.
dotnet build SplitEasy.Maui -f net10.0-maccatalyst -c Debug -t:Rebuild
-t:Rebuild picked it up immediately. The general form of this lesson, now three times over in this post: check the built artefact, never the source. The source is what you meant; the bundle is what Apple gets.
Trap 3: MSB1006: Property is not valid
The Mac App Store rejects arm64-only builds, so I passed both architectures explicitly, the way every example on the internet shows:
dotnet publish SplitEasy.Maui -f net10.0-maccatalyst -c Release \
  -p:CreatePackage=true -p:RuntimeIdentifiers="maccatalyst-x64;maccatalyst-arm64"
MSBUILD : error MSB1006: Property is not valid.
Switch: maccatalyst-arm64
A message that names neither the property nor the real problem. The shell strips the quotes, and MSBuild’s -p: switch splits on ; — because that is how it separates one property from the next. So it read RuntimeIdentifiers=maccatalyst-x64, then a second property called maccatalyst-arm64 with no value.
If you genuinely need to override the list, escape the separator:
-p:RuntimeIdentifiers=maccatalyst-x64%3Bmaccatalyst-arm64
But check first, because I didn’t need it at all:
dotnet msbuild SplitEasy.Maui/SplitEasy.Maui.csproj \
  -p:TargetFramework=net10.0-maccatalyst -p:Configuration=Release \
  -getProperty:RuntimeIdentifiers
# maccatalyst-x64;maccatalyst-arm64
In Release, both architectures are already the default. The switch that broke the build was doing nothing but restating it. Note it’s Release-only — in Debug the property is empty and a single RID is used instead.
So the command is simply:
dotnet publish SplitEasy.Maui -f net10.0-maccatalyst -c Release -p:CreatePackage=true
Trap 4: Unable to merge the file 'MauiInfo.plist'
A Release Catalyst publish builds x64 and arm64 separately and merges them into one universal bundle. Every file has to be byte-identical, and one day this stopped it:
error Unable to merge the file 'Contents/Resources/MauiInfo.plist',
it's different between the input app bundles.
MauiInfo.plist is a MAUI-internal file listing your UIAppFonts. Diffing the two copies gave the game away:
x64:    UIAppFonts => [ "MauiInfo.plist", "OpenSans-Regular.ttf", "OpenSans-Semibold.ttf" ]
arm64:  UIAppFonts => [ "OpenSans-Regular.ttf", "OpenSans-Semibold.ttf" ]
One architecture had listed the file itself as a font. MAUI generates MauiInfo.plist into obj/<config>/<tfm>/<rid>/resizetizer/f/ — the same staging folder the .ttf files are copied into — so a rebuild that finds a leftover copy sitting there enumerates it along with the fonts. My two architectures were at different points in that cycle, so they disagreed, so the merge refused.
Nothing is wrong with your project, and there is nothing to fix in a plist. Delete the intermediates:
rm -rf SplitEasy.Maui/obj/Release/net10.0-maccatalyst \
       SplitEasy.Maui/bin/Release/net10.0-maccatalyst
A clean Catalyst bundle has no MauiInfo.plist under Contents/Resources/ at all — so if you see one there, that’s the symptom, not the file you need to repair. (iOS does ship one at the bundle root; the platforms differ here, which makes it easy to misread.)
The reliable way to get into this state is mixing a single-RID build with the two-RID default in one output tree — which is one more reason not to pass RuntimeIdentifier by hand.
What you get, and the signing that isn’t automatic
That produces a .pkg — a third file type to keep straight alongside Part 8’s .ipa and .xcarchive. Transporter takes it as happily as an .ipa.
If you’d rather stay in Organizer, add the archive flag. On Catalyst these aren’t alternatives the way they are for iOS — you get both the .pkg and an Organizer entry:
dotnet publish SplitEasy.Maui -f net10.0-maccatalyst -c Release \
  -p:CreatePackage=true -p:ArchiveOnBuild=true
Verify it’s universal before trusting either one:
lipo -archs SplitEasy.app/Contents/MacOS/SplitEasy.Maui
# x86_64 arm64
And don’t add -p:RuntimeIdentifier=maccatalyst-arm64 to be explicit. Singular RuntimeIdentifier overrides the plural Release default and quietly gives you an arm64-only build — exactly what the Mac App Store rejects. I did this while testing and ended up with an archive that looks identical to the good ones in Organizer and would have been refused at upload. The only way to tell them apart is lipo.
Then the part that cost me the most, because the build succeeds either way:
pkgutil --check-signature SplitEasy.Maui-1.0.pkg
#    Status: no signature
The Catalyst target compiled clean, the app ran, the package was built and universal — and ad-hoc signed, which App Store Connect will not take. Nothing in the output says so. There’s no warning, no non-zero exit; you find out when the Build section on the version page stays empty.
Signing on Catalyst has to be asked for by name. All of it:
dotnet publish SplitEasy.Maui -f net10.0-maccatalyst -c Release -p:CreatePackage=true \
  -p:EnableCodeSigning=true -p:EnablePackageSigning=true \
  -p:CodesignKey="Apple Distribution: Your Name (TEAMID)" \
  -p:PackageSigningKey="3rd Party Mac Developer Installer: Your Name (TEAMID)" \
  -p:CodesignEntitlements="Platforms/MacCatalyst/Entitlements.plist" \
  -p:CodesignProvision="Your Mac App Store profile name"
Two certificates, because the Mac App Store wraps the app in an installer: Apple Distribution signs the .app, Mac Installer Distribution signs the .pkg around it. Anyone who has only shipped iOS has never needed the second.
The build tells you whether it worked, in a line that is easy to skim past:
Code Signing Key: "" (-)
Provisioning Profile: "" () - no entitlements     ← ad-hoc, will be refused

Code Signing Key: "Apple Distribution: … (TEAMID)" (72CEF373…)
Provisioning Profile: "SplitEasy Provisioning" (92c9aa8c…) - 3 entitlements   ← good
Three things that made this harder than it needed to be
The installer certificate has two names, and the obvious command hides it. The portal calls it Mac Installer Distribution. Your keychain calls it 3rd Party Mac Developer Installer. And:
security find-identity -v -p codesigning   # does NOT list it
security find-identity -v                  # does
An installer certificate isn’t a code-signing identity — productsign uses it, not codesign — so the -p codesigning filter drops it by design. I checked with the filtered command, concluded the certificate was missing, and went off to create one I already had.
A distribution provisioning profile can’t be installed by double-clicking it. macOS says:
Only Development Provisioning Profiles can be installed in System Settings. Production Provisioning Profiles are imported within Xcode.
This reads like a dead end and isn’t one. Distribution profiles provision no devices, so System Settings has nothing to do with them — they’re just a file the build reads at signing time. Copy it where the tooling looks:
cp ~/Downloads/YourProfile.provisionprofile \
   ~/Library/Developer/Xcode/UserData/Provisioning\ Profiles/
That’s the folder that matters. I also put a copy in the older ~/Library/MobileDevice/Provisioning Profiles/, and something tidied it away within minutes; the Xcode one survived and is the one that resolved.
Organizer distributes archives, not packages. If you want the Organizer route, you need -p:ArchiveOnBuild=true — there’s nothing to drag a .pkg into. And by then my Archives list held seven macOS entries from an evening of testing, all the same app, same version, same build number, and visually identical. Only one was signed and universal. Nothing in Organizer distinguishes them:
A="$HOME/Library/Developer/Xcode/Archives/<date>/<name>.xcarchive"
lipo -archs "$(find "$A/Products" -type f -path '*/MacOS/*' | head -1)"
ls "$A/Products/Applications/"*.app/Contents/embedded.provisionprofile
Delete the failures as you go. A stale archive that looks right is worse than no archive.
Two smaller things
Screenshots are a different shape. macOS wants 1280 × 800, 1440 × 900, 2560 × 1600 or 2880 × 1800. The neat trick: size the app window to 1280 × 800 points and capture it on any Retina Mac, and you get 2560 × 1600 with no scaling anywhere.
Build numbers don’t cross platforms. iOS and macOS share an App Store Connect record but not a CFBundleVersion, and each refuses a number it has already seen. In a MAUI csproj, ApplicationVersion is shared across every target — including Android’s versionCode — so bumping it for one store quietly moves the others. Condition it:
<ApplicationVersion Condition="$([MSBuild]::GetTargetPlatformIdentifier('$(TargetFramework)')) == 'ios'">2</ApplicationVersion>
<ApplicationVersion Condition="$([MSBuild]::GetTargetPlatformIdentifier('$(TargetFramework)')) == 'maccatalyst'">1</ApplicationVersion>
Three stores, three counters, no shared state.
Where it ended up
Signed app, signed package, embedded profile, both architectures:
codesign --verify --deep --strict SplitEasy.app     # valid, TeamIdentifier=…
pkgutil --check-signature ….pkg                     # 3rd Party Mac Developer Installer: …
lipo -archs …/Contents/MacOS/SplitEasy.Maui         # x86_64 arm64
ls …/Contents/embedded.provisionprofile             # present
Which is the whole of it. Not one of the things that stopped me was the Catalyst build. It compiled clean the first time and the app ran the first time. Everything that cost an evening was packaging, signing and tooling — a stale intermediate that poisoned a font list, a shell that ate a semicolon, a filter that hid a certificate, and a dialog that said “no” to something I didn’t need to do.
That’s the same shape as the iOS half of this post, and probably the real lesson of both: the platform is fine, the path to the platform is where the time goes.
One thing to check that I can’t answer for you
Adding macOS to the same app record means it shares that record’s App Privacy answers. My iOS listing declares advertising data because of AdMob; my Mac build starts no ad SDK at all — but if those answers are record-level rather than per-platform, the Mac listing describes ads it will never show. The alternative is a separate app record with its own bundle id, which costs you the shared identity and a second set of metadata.